Monday, April 18, 2011

Quilts, no baby

Well, being officially 5 days overdue is good for one thing and one thing only... getting quilts done. I much prefer to be snuggling with a tiny little person right now but sewing is a lovely distraction.


I was recently contacted by my NYC twin. Not really a twin but we are living parallel lives. She has two girls and was due with her 3rd baby the day after I was due with my 3rd. Except she actually HAD her baby and I'm still waiting. Did I mention I'm still waiting to give birth?


Anyway she wanted a special quilt to accomodate a family of 5 for picnics and such. So we came up with this. It came together really fast and with lots of love. Because when you feel a special connection to the person you're making it for, you just want it to be perfect. Just waiting on the label and then attach the binding and then it's off to baby Brody.


My other current project is a rag quilt for little girl who is about to turn 1. This is one creative family!


Lots of pictures and messages of love. It only makes me feel bad that I haven't done anything nearly as meaningful for my own children. Someday, my loves! Thankfully I have very imaginative and creative clients that give me lots of inspiration.


Well I guess I'm signing off until baby comes. It will come. That's what they tell me, no one has been pregnant forever. Until then have a blessed Easter season. He has risen! He has risen indeed! Hallelujah!

Friday, April 8, 2011

A winner!

Random.org has chosen #4, The Knapps, for the CSN Giveaway. Double congratulations to you as you commented on a baby on the way!! Hooray! I'll be sending you an email with the info.

Speaking of babies, I HOPEFULLY will be also joining the baby club (again) soon. Due date is approaching and we are all a-twitter here. Well, mostly just me and hubs.


I am so tickled I got to make some more Love pillow covers. Funny it was exactly a year ago that I did the tutorial with Amy Butler's Love fabric.

My oldest turned 5 (FIVE?!) this week. So no one told me teenage drama would start at 5. I'm going to keep blaming the no sleep situation and hope it will soon pass. However we did have a lovely time at the "birthday house" as she calls it. Being 39 weeks pregnant we kept it very low key. MIL brought pasta, I made some pulled pork BBQ and dad grilled out some chicken sausage brat things. I'm all for simple but nice.


AND I met my goal of completing this quilt before baby came. A sweety of a client commisssioned me to make this for her daughter's birthday on the same day as my daughters! Well I'll be... It did have silks in the front which did not survive the washing and drying process. Probably would have done ok if it were a regular quilt but as a rag quilt it did not work out. So I had to undo the entire - YES, I said entire - quilt to pull out the 17 silk squares. Substituted them with regular cotton fabric and we're back on track. The velvet is still on the back which I pray will wash well and last for lifetimes.


Congrats, The Knapps! Happy Birthday to my little girl and the velvet birthday girl! Blessings all around!

Monday, March 28, 2011

GIVEAWAY TIME! And a lot of quilt pictures.

Eek! It's almost been two whole months?! I promise I've steadily been working away. I've even got the pictures to prove it. Baby #3 will be here any minute now (eek again!) and we've had to re-arrange the entire bedroom situation at home. The girls are now in one room together. Oh help me!


For the first time I've really felt the desire to decorate my home in a beautiful way. Before things were just kinda hodge-podge. But now I have 2 UNNECESSARY pillows on my bed for a grand total of 4. I know, it's time I became an adult. Another thing I'm really loving is lighting. Being that hubs is in the electrical design world, I have to bring my A-game for any lighting suggestions. I must say that after months of looking around, CSN has some really cool, modern fixtures. I'm really wanting some pendant lighting for the bedroom. Our house is surrounded by tall gangly trees and never gets hot in the summer. Why all the ceiling fans?! Let's make this place gorgeous!


First coat of new blue walls. See! No room is safe here.

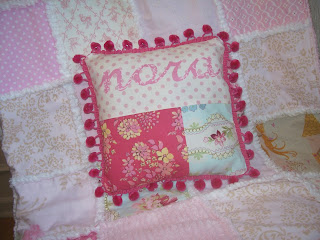
But since it feels like I've been under a rock I want to liven things up and do another fantastic CSN Giveaway! Just leave a comment about how I get my girls to actually sleep at night instead of dance around until 10pm. :) OR tell me your current home dec project. It's spring, I know you're working on something. I'll pick a random winner next week who will receive a $30 gift cert to CSN for lighting purchases or whatever your little heart desires. And now some of the quilts I've been working on the past month: An adorable twin patchwork commission. My girls were both sad to see me box it up. They were totally hoping it was for them. Sorry, girls. You'll get quilts of your own someday... And let the rag quilt mania begin! Being super pregnant, I was thrilled to pieces that so many people wanted rag quilts in my last trimester. Basting a quilt at 9 mths pregnant is just not a pretty thing. Oh! So I've started making pillows now and they are super fun. Yuck, blurry picture. Can I ask for a new camera for Mother's Day without seeming too demanding? Honey? Someone? Pretty please?
Here we have rag quilt #736. Everyone adds their own special flare. Lavender, an old nightgown from grandma, pictures on fabric paper, etc. I love quilts! They all end up just right for their special people to keep warm and save memories in a very useful way. Maybe that's why scrapbooking never spoke to me. I can' t do anything with a book other than open it. Or fix a wobbly table.

And the present creation - this client wanted to incorporate silks and velvet into her quilt. Mama mia! It is a texture party everywhere here!


I'm so thankful to have had a wonderful start to the year. God continues to bless me richly with my growing family and fun little business. You just never know where He is going to take you.


Don't forget to leave a comment for the CSN Giveaway! Happy Decorating and a blessed Lenten season.

Wednesday, February 2, 2011

A Clean Mess

Happy Winter! As I write this we are getting slammed with snow, rain, sleet, ice and maybe some tarantulas. Seems like all kinds of things are falling from the sky and we never know what is coming next. Personally I love it. Snow me in for days and I will be a happy camper. As long as my awesome fam is all around me, bring it on!

I thought I'd share a fun activity we love here. I cannot take one ounce of credit for this. I belong to a fabulous group of neighborhood mamas (MOMS Club) who are so generous to share their creative ideas of what works in their homes. I believe this originally came from Betsy. THANK YOU!


It takes us about a half hour from start to finish. It's messy, but clean at the same time! The messier they get, the cleaner the table becomes. How cool is that! Plus the kids are getting all lathered up themselves so I'm thinking it's double duty on them as well.

I know it sounds strange, I was very hesitant to try it. However it really does work and it's not like a fountain of running water pouring over the edges as I first imagined it would be.


To start, dribble a little water on the table.

Then drip a few soap droplets from your dish washing soap container and let the little people get to work!

Have about a 1/2 cup of water and a bottle of dish soap handy. As it lathers, both the water and soap will need replenishing.


My girls ask to do this almost nightly but I try to sqeeze it in weekly - or wait until the table is so grimey it's barely recognizeable.

When everyone has had enough, I send them to the bathroom to rinse their hands off while I use a wet washcloth to wipe down the table. This is also a good time to get the wet-mop out as there will be dribbles on the floor.


You can see my dish soap and little cup o' water on the table here. My girls are ages 4 and 2. Both are able to fully participate, feel useful, get messy, and have fun. I love doing this with them! Give it a try sometime. And then look up your nearest MOMS Club chapter so you can spread the word and your own motherly wisdom!

PS - Please feel free to leave more ideas in the comments. I think all mamas are looking for fun things to do with the kiddies, especially in the winter.

Sunday, January 16, 2011

Crash Course in Applique {Tutorial}

Does the word applique scare the pants off you with it's Frenchy-French accent thing and the thought of ... well, whatever might be involved? It's ok, my pants were scared off too at one point. Well fear not, friends! Here is a crash course in applique. In 10 easy steps you too can add all the bells and whistles you once thought were out of reach. Shall we?
Supplies:
*computer with Word program (or something like that)
*printer
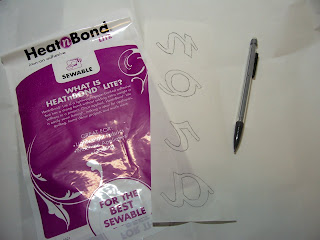
*Heat n Bond Lite
*iron
*pencil
*fabric
*sewing machine stuff (applique foot if possible)


First I suggest you find a friend with a short name. :)
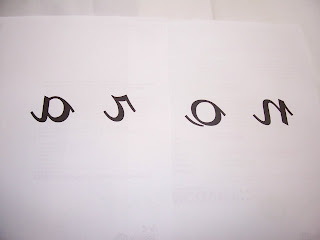
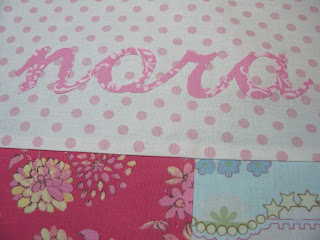
1- Type the name/word in the desired font on the computer. This is French Script at 375 point font. To increase the font from the sizes on the pull-down menu, just highlight it and right click on "font". Then type your number in the little box.

2- Print the mirror image (or sometimes called transparency setting) so that the letters print out backward. Not so important if it's a non-directinal design, but with letters it's big deal. So print 'em backwards!


3- Trace the backwards print out onto the paper side of the Heat n Bond. There's a bumpy side and paper side.


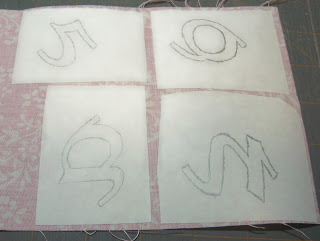
4- Cut out around letters giving yourself some space. See above where there's a good inch or so around the letter.
5- Place these letter squares on appropriatly-sized fabric scraps. Check your placement to make sure it's all where you want it to be.
6- Iron the squares (rough side down) onto the BACK of the fabric. You're essentially making fabric stickers here. The rough side of the Heat n Bond creates a sticky back for the fabric.

7- Cut out around the pencil lines to reveal some sweet-looking letters!
8- Places the letters on the background fabric, play with the placement and make sure it's all good.
9- When you are happy with where they should go, peel the paper off the back. I usually do this at the ironing board with the iron hot and ready. Make sure your placement is good again and then when you're totally sure - iron it down. No steaming is necessary and it really takes about 5-10 seconds.


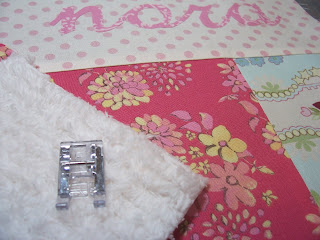
10- At this point you can be done but if you like to make it fray-proof and longer-lasting, sew around the letters using an applique foot and blanket stitch. I've included a picture of an applique foot. It looks pretty normal except has a clear/wide hole where you can see exactly what's going on while the machine is sewing.
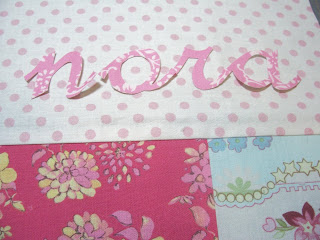
Finish up your little project after those 10 easy applique steps. Nice work! You can show those Frenchy-accent words who's boss now.


Sunday, January 9, 2011

Rag Quilt {Tutorial}

Hi everyone! Happy New Year! Is it ok to still say that?

How are your resolutions going? My resolution (I try to only make one and only one) for 2010 was to do better at meal planning. I wasn't doing it AT ALL, so I figured I could only improve. I'm happy to say that I really did get in the groove. I started out hard core and gained weight + spent more money. Then started to fizzle out but in the end I found a method that worked for me - a loose plan - and I think I found the winning combination.

Anyhoo my resolution for 2011 is.... to make my own laundry detergent! Apparently you can do it easily and spend approximately $10 a year. Good news since we are about to become a family of 5 and have laundry come out the ying yang. Haven't made any yet but you'll be sure to know when and how and all the good stuff.

So - I've had some rag quilt questions over on flickr and on my Janome Yahoo group this week. Since I'm in the middle of making eleventy million of them, I figured it was time to get some words and pictures together from my little sewing nook.
Supplies:
*Fabric (Can be various scraps or charm packs. Don't put a charm pack through the wash. It will disappear.)
*Flannel ( I usually use white but you can get creative with the color. Also pre-shrink flannel - wash and dry.)
*Walking foot is nice for the sewing machine (not necessary, but makes sewing through alllll those layers easier)
*Spring-loaded scissors (Kinda actually necessary so you don't get hand paralysis and quit before the quilt is done)
This is perfect for beginners, even children, making their first quilt. It's great for instant gratification and quick results. I love rag quilts!

I was all set to make my my girls a fun little Dr. Seuss rag quilt for the play room/reading corner but my oldest daugther became horribly terrified of The Cat in the Hat this summer.


Hmm... Can't say that I blame her. But the rest of the fabric is bright, colorful, fun, and totally great.


The first thing you do is cut your fabric into squares. Totally doesn't matter what size. I usually do mine at 6" because I have a 6" ruler and it goes faster. Keep in mind that you will lose 1-2" after they are all sewn together so you might want to keep them on the bigger side.


Next is decision time. You must decide before you start sewing if you want your backing to be patchwork like the front (only without the raggy edges) OR a seperate back that you attach when it's all done. Should you go the patchwork route, you should stack 1 each of:


1- fabric (face down)
2- flannel
3- fabric (face up)

Next: sew a big X corner to corner on each little fabric/flannel/fabric sandwich to keep everything even steven - picture below.

Patchwork back identical to the front


See my X

So after you cut the fabric and flannel both the same size, it is time to sew! If making and attaching the back seperately, take a flannel square and place a fabric square on top (face up). You can sew an X across each block to keep everything centered or you can just wing it.

For most quilters it seems a little bit nutso at first because you are sewing WRONG sides together instead of right sides together as we usually do.

Another bit of important info - make your seam allowances about 1/2". It must be bigger than 1/4" so you have room to snip without cutting into the seam. Some people go much wider than 1/2" and that's fine, the raggy edges will be more floppy. I like to keep mine in check so I keep it on the small side.


Two blocks sewn together (flannel squares underneath) and the seam is exposed.


Do a row like this until all horizontal rows are done and then join the rows together one at a time until the front (and back too perhaps) is complete.
Here's a picture of what a cross-section would look like. I try to open up the seams as my walking foot plows through.


Now that your front is complete, make sure to have a fantastic pair of spring-loaded scissors . These are not the particular ones that I have but I'm sure they're fine. Put on a nice long movie, get comfy on the couch, and start snipping all those exposed seams at about 1/2" to 1/4" from each other. Sometimes it takes a few days to do, but that's ok. It's a great project to take in the car or waiting for your kiddos at dance. (Good conversation starter too, BTW.)

If making the identical patchwork backing, be sure to sew around the perimeter of the quilt and also snip around the outer edges.

If making a seperate backing, cut it the same size as your quilt and sew right sides together (backing and quilt), leaving a little opening (4-5") for turning. Be sure to backstitch at the beginning and end.

Now turn right sides out, use a ruler or something kind of sharp to poke out the corners, but don't puncture it in all your square-quilt madness.

Edgestitch all the way around (1/8" or so) making sure to close the opening you just used for turning.

Once they are all snipped throw that puppy in the laundry, wash and dry. Do be aware that there is some crazy lint going on the first few washes so maybe do it with a load of towels or something. But oooooh, you will be in love when it comes out of the dryer. Crazy soft and super duper nice to cuddle with.

Up next... the back of the Dr. Seuss quilt. I have a little crash course in applique for ya'll.

I'd love to hear if this was helpful at all. And of course, I love to see pictures of what you make! Always feel free to ask questions, that's why I'm here. Thanks for stopping by!

Saturday, January 1, 2011

Winner + Boy Quilts

The winner of the CSN Giveaway is #1 Sarah! Someday I will learn how to import the Random.org widget for proof. If any of you are keen on that, I'd love to know how to do it. Anyhoo, thanks so much to all who entered and what fun gifts you gave your loved ones!

I've had some boy quilts enter my life lately. A good friend roped her brother into taking pictures of my loot from the shop. He did a great job of making my quilts look extremely gorgeous so naturally I got to repay the favor with a quilt for the baby boy on the way.
It was my first time to work with Echino fabric and it was great! A tad on the expensive side but totally worth it. I love the linen feel of it and how extremely creative the prints are. The repeats are a fantastic blend of stripes, dots, and a novelty item (helicoptes, busses, and cameras in this case).
Next up was a rag quilt (surprise, surprise!) made with Robots from David Walker. I ran across an unbelievable sale a while back and went hog wild ordering the entire line. Rag quilts are such a dream to make at this point in my life. Pretty fast, easy, and always a fun result when it comes out of the dryer all fluffed up.
I'm thinking of doing a rag quilt tutorial since I'm going a little nutso over here with them. I assume there are a gazillion out there already, but what's one more, right?
A very happy new year to you all. May it be safe, happy, healthy and quilty! Thank you so much for stopping by my little blog. Cheers!